RSS
Showing posts with label dessert. Show all posts

Cookies and Cream Cookies


When I was little, I would love coming home from school to find my Mom had made us a special treat.  I am definitely a food lover and somehow I really felt loved when cookies, or brownies or some other goody was waiting for me.  Now that I am a mom, I love to make a special treat on Fridays for my girls to come home to.  Sure, it is usually something sugary, but it's a treat.  I usually make it on Fridays as a little celebration - "YEAH!! You survived school for the week"! -- Something to look forward too.  My husband has been on a cookie kick lately, so it has been a lot of cookies the last few weeks.  I was having trouble coming up with a cookie idea, so I asked my youngest daughter what she would like this time around.  One of her favorite candy bars is cookies and cream (she is a big white chocolate fan - not so much any other chocolate though).  She asked for a cookies and cream cookie.  So I decided to make cookies with cookies!  Why not!  So here goes...
 
 
Cookies and Cream Cookies
makes 4 dozen

Ingredients
1 1/2 tsp Ener-G Egg Replacer
2 Tbsp water
1 cup vegan butter, softened
1 1/2 cups sugar
1 tsp vanilla
2 3/4 cups flour
1 tsp baking soda
1/2 tsp baking powder
1 1/2 cups crushed Oreo cookies

Directions
Preheat oven to 350 degrees.

In a small bowl whisk together the egg replacer and the water and set aside.

In a large bowl, cream together the butter and sugar until smooth.  Beat in the egg replacer mixture and vanilla. 

Combine the flour, baking soda and baking powder in a separate bowl.  Gradually add this mixture into the dough to make it nice and thick.  Add the crushed Oreo cookies and stir in well.  I used my hands to really incorporate the Oreos - so their weren't crumbs lying on the bottom of the bowl.

Roll dough into balls about 1 1/2 inches in diameter and place on an ungreased, nonstick baking sheet about 2 inches apart.  You can use parchment paper for a quicker clean up if you'd like!  Bake for about 11-12 minutes, or until they start to turn a golden color around the edges.  Let cool on cookie sheet for about 2 minutes and then transfer to a cooling rack.


Peppermint Stick with Chocolate Chunks Ice Cream


It is spring but we are already hitting the hot temperatures. And there is nothing better to beat the heat than a cold bowl of ice cream. I had some candy canes left over from Christmas and thought a peppermint ice cream would be very refreshing. I used to love it as a kid when my parents would by Peppermint Stick ice cream at Christmas time. We were very big ice cream eaters back in the day! Anyway, this is what I came up with and it turned out just as delicious as I remembered the dairy version to be. I hope you like it too!

Peppermint Stick with Chocolate Chunks Ice Cream

Ingredients
1 13.5 ounce can organic coconut milk
1 1/4 cups non-dairy milk
1/2 cup organic pure cane sugar
1 tsp vanilla extract
1 tsp peppermint extract
8 candy canes or 25 round peppermint hard candies, divided
½ cup semi-sweet chocolate chips
½ tsp olive oil


Directions
In a large bowl, combine coconut milk, non-dairy milk, cane sugar, vanilla extract, and peppermint extract, whisk together well. Refrigerate for at least 2 hours.
While you are waiting, unwrap candy canes and throw in to a food processor or blender.  Pulse repeatedly until the candies become course pieces.  Set aside.

Once ice cream base is chilled, make according to your ice cream maker‘s instructions.  While it is churning, melt the chocolate chips and oil in a small sauce pan on low heat.  Stir often, until completely melted and smooth; take off heat and set aside.  Add in ½ the candy cane pieces during the last five minutes of churning to incorporate thoroughly.
Transfer spoonfuls of the ice cream into an airtight container and drizzle each addition with a very fine ribbon of the liquid chocolate.  The chocolate will set up almost immediately upon contact.  Also sprinkle each addition with the remaining candy cane pieces.  Once all of the ice cream and chocolate is in the container, give the whole mixture a good stir with the end of a wooden spoon to break up the chocolate ribbon into pieces. 

Stash in your freezer for at least three hours to firm up before serving.

Zucchini (Mock Apple) Pie


What do you do when you have ginormous zucchinis and your family would rather starve than eat them? 

You make pie!!!

I seem to be the only one who likes zucchini in this family, so when I end up with large zucchinis out of my garden I am kind of at a loss.  You can only make so many loaves of bread, muffins, cookies, etc. before your family is tired of YOU and your ZUCCHINI!  For those of you out there who don't have this problem - lucky you! 

So....why not try pie!  This pie tastes so much like apple pie your family will think you are lying if you tell them anything different.  It is so delicious and a great new twist on (in my opinion) zucchini! 

You don't even have to tell them it's zucchini!  Although I've told my family and they still loved it.  I still can't quite figure out the magical secret  - but I think it has to do with the cream of tartar.  Maybe??  Somehow the zucchini tastes like apples.  Crazy!

A little note - I added how I made my crust for this pie - but feel free to use your own recipe or even buy a store bought crust if you are in a hurry.  However the crust in this recipe is delicious if you want to give a try!

I would like to have posted more pictures for this recipe - but the pie was eaten too fast!  Maybe I'll add some more later!


Zucchini (Mock Apple) Pie
Cook time:  30 to 35 minutes
Makes:  8 servings

Ingredients

Crust:
1 1/3 cups flour
1/2 tsp salt
1/2 cup shortening
3 Tbsp water

Filling:
4 1/2 -5 cups halved and sliced zucchini (approx. 2 large)
1/2 cup brown sugar
3/4 cups white sugar
1 1/2 tsp cinnamon
1 1/2 tsp cream of tartar
4 Tbsp flour

Topping:
1 cup flour
1/2 cup packed brown sugar
1/2 cup firm stick butter

Directions
Preheat oven to 400 degrees. 

Combine the flour and salt in mixing bowl.  Using your hands mix in the shortening until it is in uniform crumbles - it should be fairly course.  Sprinkle one tablespoon of water at at time, mixing lightly with your hands.  When all the water has been added, work dough into a firm ball. 
Press the dough into a flat circle with smooth edges on a lightly floured surface.  Roll the dough out until it is about 1/8 inch thick and about 1 1/2 inches larger than your pie plate.  Pick dough up and gently ease into pie plate, being careful not to stretch the dough.  Trim 1/2 inch beyond edge of pie plate, fold under to make double thickness around rim.  Flute the edges.
Peel zucchini, cut in half lengthwise and scrape out the seeds.  Slice the zucchini halves into thinly sliced half moons.
Throw zucchini in a pan of boiling water, take off heat, cover with a lid, and steam for about 6-7 minutes until just barely fork tender.  Drain the zucchini and empty onto a paper towel lined plate, sprinkle with salt.

In another bowl combine the brown sugar, white sugar, cinnamon, cream of tartar and flour.  Return drained zucchini back to pan and stir in the sugar mixture.  It till be pretty runny.
Pour everything into the 9-inch pie crust. 

For the French topping, mix flour, brown sugar, and butter until crumbly.  Sprinkle evenly over the zucchini mixture.                                        

Bake for 35-40 minutes.  The liquid will still be runny but will thicken as it cools.


Oatmeal-Raisin Cookie Larabars


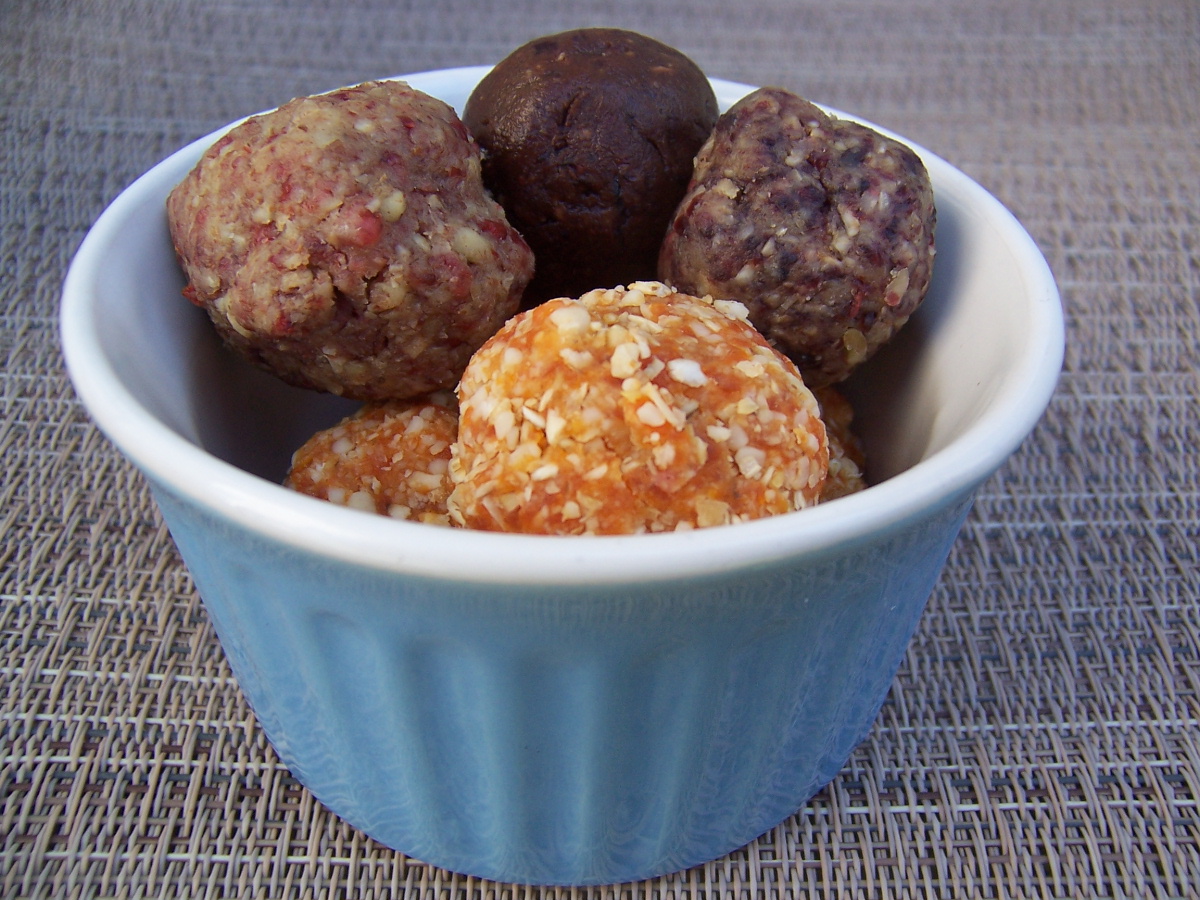
I have discovered something I am totally excited about.  Recipes for homemade Larabars.  I don't think I have even tried a Larabar, although I have seen them at the store. I was craving something that felt a little naughty yet healthy.  One of my favorite blogs these days is Chocolate Covered Katie http://chocolatecoveredkatie.com/   I love her blog!  She has a fun vegan blog full of recipes that are naughty but much healthier for you.  Anyway, I decided I would look for something on her blog to make yesterday and decided to make her Oatmeal Raisin Cookie Larabars. http://chocolatecoveredkatie.com/2011/11/14/oatmeal-raisin-cookie-larabars/  I didn't have raisins however so I decided to use blueberry flavored craisins.  OH MY........ .it was SO delicious, I decided to make up some more batches and play around with the ingredients.  I tried new flavors and made them into double batches.  All of them turned out very yummy!  I tried orange flavor craisins with pecans, and papaya with cashews.  I was having so much fun I decided to try another one of her recipes, Chocolate PB Cookie Laura bars. http://chocolatecoveredkatie.com/2011/10/02/chocolate-peanut-butter-no-bake-cookies/  I substituted my blueberry craisins for the raisins again. 

Everything was so good....I am in love.  The coolest thing is - NO ADDED SUGAR!!  When I told my husband, he was shocked.  The raisins (or craisins in my case) sweeten it up.  They taste a little like eating cookie dough.  I am going to be have fun playing around with the recipe more.  I'm thinking coconut would be SO good!

So anyway try these and have fun getting creative with your flavors too.  You might surprise yourself.  Also be sure to check out Chocolate Covered Katie - she especially likes to make things with chocolate.  Can't go wrong there!   Oh, and FYI, my pictures show the four different versions I made, incase you were wondering about the different colors.


Oatmeal-Raisin Cookie Larabars

1/2 cup raisins
6 T quick oats
1/2 cup walnuts
1/8 tsp plus 1/16 tsp salt
1/4 tsp pure vanilla extract

Pulverize the oats in a food processor, then add all other ingredients and blend very well. Form into balls or bars. (If you want, you can portion the dough into plastic bags before smushing the bars, so your hands don’t get sticky.)

This recipe makes a little over three Larabar-sized bars.  The bars last at least two weeks in the fridge. They can also be frozen.

Apple Nachos

It is apple season time and my family loves apples.  This year I spotted a recipe for some apple nachos and just had to try them!  My family kept having me repeat that I was going to make them "apple" nachos.  They thought they must be hearing me wrong.  Anyway it was a big hit!  You really can't go wrong making these - and the fun thing is you can really get creative with what you put on these.  You definitely want crispy apples and the slightly tart goes really well with all the sweet things you put on them - so keep that in mind.  This is what I did with my nachos - but feel free to be creative and put your favorite things on it.


Apple Nachos

3 crispy and slightly tart apples
3 tbsp creamy natural peanut butter
1/4 cup sliced almonds
1/4 chopped pecans
1/4 cup coconut flakes
1/4 cup vegan chocolate chips

Slice the apples thin enough so it would be easy to eat the slice in one or two bites.
Then melt the peanut butter, until it is runny, and drizzle it all over the apples. Next, top the apples and peanut butter with sliced almonds, chopped pecans, coconut flakes and chocolate chips. Then go nuts!

Chocolate Covered Cherry Pudding Cake

OK, here is my first recipe.  I found it from one on my favorite blogs, http://blog.fatfreevegan.com/.  I made it for Valentines Day and it was so yummy, I licked the bowl and still wanted more!  One little note, if you'd like, you can substitute the soy yogurt for regular yogurt - I used vanilla coconut yogurt - delicious by the way!  Also you can use regular milk instead of the soymilk.  I used chocolate almond milk - also very good!  I hope you enjoy this recipe as much as I did!  Let me know what you think!


Chocolate Covered Cherry Pudding Cake
The sauce “magically” sinks down through the cake to form a layer of cherries nestled in chocolate pudding on the bottom. Serve warm or chilled, with or without non-dairy ice cream.
20 frozen pitted cherries (about 1 cup)
1 teaspoon sugar
1/4 teaspoon rum extract (optional)
1/3 cup brown sugar
2 tablespoons cocoa
1 teaspoon cornstarch
1/2 cup unbleached flour
1/8 teaspoon salt
1/3 cup sugar
1 1/2 tablespoons cocoa
1 teaspoon baking powder
1 1/2 teaspoons vanilla extract
1 1/2 tablespoons soy yogurt
1/4 cup vanilla soymilk (or other non-dairy milk)
boiling water


Cut the frozen cherries in half (it’s easiest to do this while they’re frozen). Put them in a bowl and stir in 1 teaspoon sugar and rum extract, if using. Allow them to sit at room temperature until they’ve completely thawed and become juicy, 1-2 hours.
Oil or pan spray 4 7-ounce ramekins. Preheat the oven to 350F. Mix together the brown sugar and 2 tablespoons cocoa powder and set aside.
Pour the juices off the cherries into a measuring cup. Press lightly on the cherries to get all of the juice (I had about 1/4 cup). Sprinkle the corn starch over the cherries and mix well. Divide the cherries equally among the 4 ramekins.
In a medium bowl, combine the flour, salt, 1/3 cup sugar, 1 1/2 tablespoons cocoa, and baking powder. Stir in the vanilla extract, soy yogurt, and soymilk. (Mixture will be very thick.) Drop by tablespoons over the cherries in the ramekins, dividing equally among them. Smooth to cover the cherries.
Sprinkle the brown sugar mixture evenly over the batter, about 2 tablespoons per ramekin. Use a spoon to level the tops.
Add boiling water to the cherry juice up to the 3/4 cup line. Pour or spoon it gently over the brown sugar in the ramekins, about 3 tablespoons per ramekin. Place the ramekins in the oven and bake for about 25-30 minutes, until tops appear mostly dry (they should be streaked with darker, wetter looking areas) and sauce is bubbling around the edges. Remove from oven and allow to cool for 15 minutes before serving.
Makes 4 servings. Per serving: 251 Calories (kcal); 1g Total Fat; (3% calories from fat); 4g Protein; 60g Carbohydrate; 0mg Cholesterol; 201mg Sodium; 3g Fiber. Weight Watchers 5 points.