RSS

Raviolis


My girls love raviolis - it is one of their favorite things to eat.  They often ask for me to make them for dinner.  I haven't had any luck finding any vegan versions at the grocery store so I have had to get a little creative.  I don't want my girls to feel like being vegan you are missing out on anything, so I try to accommodate them when I can.  So I have come up with a delicious alternative to the traditional ravioli, and I do have to say...they are awesome.  I can't wait to make this recipe again!  They are actually pretty fast and easy to make because I used gyoza (wonton) dough from the store.  You could always make your own dough if you wanted to take the time.  I just don't have a lot of time to spare with two teenagers in the house.  I make the filling with garbanzo beans, although I think most people would typically use tofu.  I personally try to stay away from soy when I can and I think the garbanzos are great in this recipe!  This recipe will probably only serve 2-4 people.  For my family I would definitely double it, because they eat them like they are going out of style!

Raviolis 

1 15.5 oz can garbanzo beans, drained and rinsed (1 ½ cups)
1 Tbsp lemon juice
1 Tbsp nutritional yeast
1 ½ Tbsp Vegenaise
1 tsp Italian seasoning
1 tsp parsley
1 tsp minced garlic
1 tsp barley miso
Salt and pepper to taste
Gyoza wrappers (24)
 
Combine all the ingredients except for the gyoza wrappers in a food processor.  Mix until creamy, it doesn’t need to be completely smooth – some texture is good. 


Put a slightly rounded ½ Tbsp of mixture on the center of a gyoza wrapper.  Moisten the edges lightly with water and fold over.  Press the edges together to seal.

Drop the raviolis in boiling water for about 3-5 minutes.  Drain water and serve with your favorite sauce.

Oatmeal-Raisin Cookie Larabars


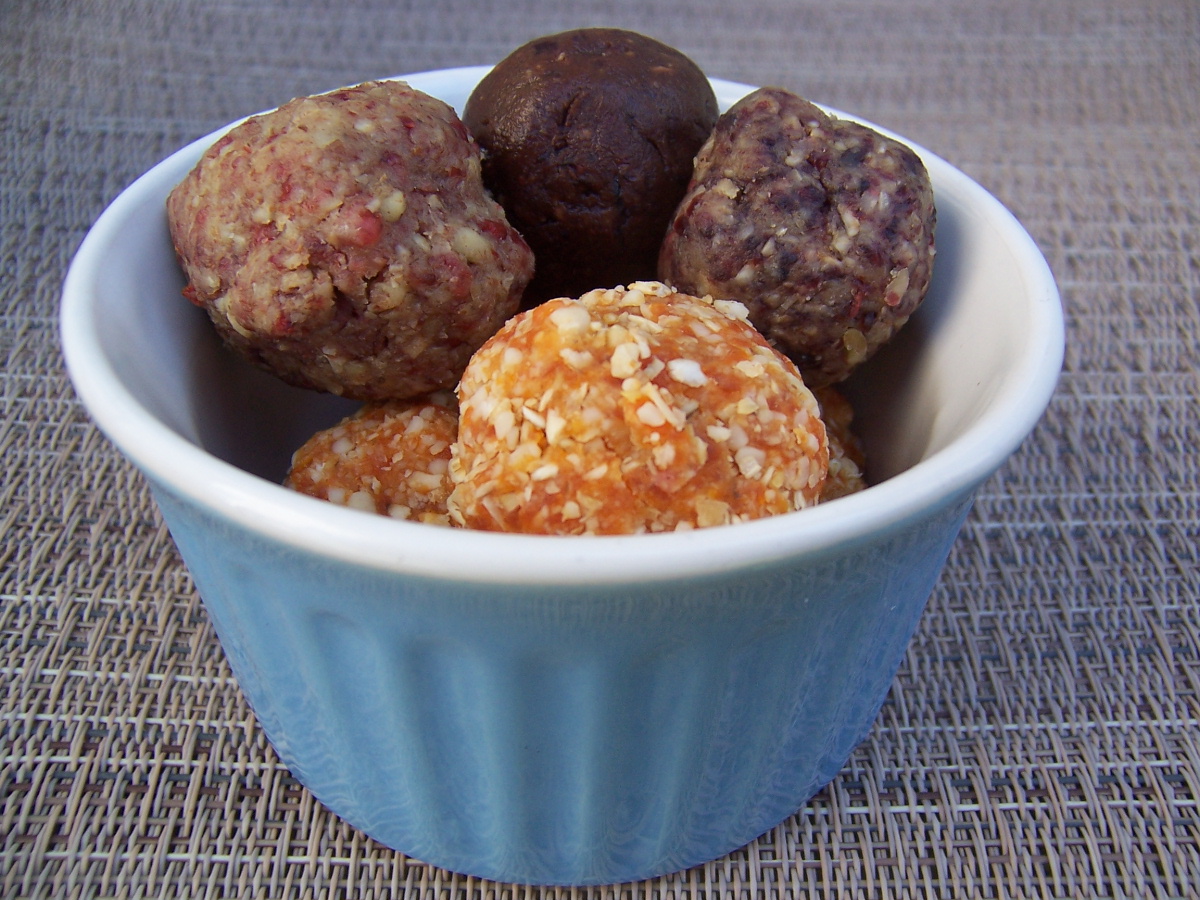
I have discovered something I am totally excited about.  Recipes for homemade Larabars.  I don't think I have even tried a Larabar, although I have seen them at the store. I was craving something that felt a little naughty yet healthy.  One of my favorite blogs these days is Chocolate Covered Katie http://chocolatecoveredkatie.com/   I love her blog!  She has a fun vegan blog full of recipes that are naughty but much healthier for you.  Anyway, I decided I would look for something on her blog to make yesterday and decided to make her Oatmeal Raisin Cookie Larabars. http://chocolatecoveredkatie.com/2011/11/14/oatmeal-raisin-cookie-larabars/  I didn't have raisins however so I decided to use blueberry flavored craisins.  OH MY........ .it was SO delicious, I decided to make up some more batches and play around with the ingredients.  I tried new flavors and made them into double batches.  All of them turned out very yummy!  I tried orange flavor craisins with pecans, and papaya with cashews.  I was having so much fun I decided to try another one of her recipes, Chocolate PB Cookie Laura bars. http://chocolatecoveredkatie.com/2011/10/02/chocolate-peanut-butter-no-bake-cookies/  I substituted my blueberry craisins for the raisins again. 

Everything was so good....I am in love.  The coolest thing is - NO ADDED SUGAR!!  When I told my husband, he was shocked.  The raisins (or craisins in my case) sweeten it up.  They taste a little like eating cookie dough.  I am going to be have fun playing around with the recipe more.  I'm thinking coconut would be SO good!

So anyway try these and have fun getting creative with your flavors too.  You might surprise yourself.  Also be sure to check out Chocolate Covered Katie - she especially likes to make things with chocolate.  Can't go wrong there!   Oh, and FYI, my pictures show the four different versions I made, incase you were wondering about the different colors.


Oatmeal-Raisin Cookie Larabars

1/2 cup raisins
6 T quick oats
1/2 cup walnuts
1/8 tsp plus 1/16 tsp salt
1/4 tsp pure vanilla extract

Pulverize the oats in a food processor, then add all other ingredients and blend very well. Form into balls or bars. (If you want, you can portion the dough into plastic bags before smushing the bars, so your hands don’t get sticky.)

This recipe makes a little over three Larabar-sized bars.  The bars last at least two weeks in the fridge. They can also be frozen.

No Chicken Noodle Soup


This soup is about as easy as it gets!  So if you are in need of some comfort food and something to warm your soul this is the recipe for you!  It takes maybe 20 minutes from start to finish and the result is very pleasing.  My family loves pasta that comes in various shapes.  They seem to be heartier and brings out the kid in you. Isn't that what chicken noodle soup is all about anyway!?!  My favorite place to get pasta is at Cost Plus, they have shapes for the current holidays and other fun ones.  As you can see in this picture it was March, because of the shamrocks!  It's not the best picture because my camera battery was quickly dieing and I had only a second to take it, but I will update with better pictures in the future!

No Chicken Noodle Soup
Makes: 4-6 servings  (My family of 4 devours the whole thing!)

Ingredients
8 cups water
3 Tbsp. no chicken bouillon
2 medium carrots, sliced (1 cup)
2 medium stalks celery, sliced (1 cup)
¼ c chopped onion
8 oz. favorite pasta (shapes)
Fresh or dried parsley

Directions
Combine the water and bouillon in a large pot.  Add the carrots, celery and onion and bring to a boil.  Add the pasta and turn down to a simmer; cooking until the pasta is al dente.  Add the parsley and stir. 


Chickpea Lasagna


My favorite food is pizza, but lasagna is a very close second.  Lasagna has to be one of the unhealthiest things a person can dive into, but ohhh.... so delicious!  I really hated the thought of not being able to splurge on this heavenly dish, so I made it my mission to try and find a vegan way to make it. 

When I first started out as a vegan, I was eating a lot of soy and was able to find some really yummy vegan lasagna recipes with tofu.  But after a while I decided maybe soy wasn't for me and so I needed to find a way to make lasagna without tofu.  I think I have been able to come up with a good alternative.  My real test was having my kids try it.  When they ate almost a whole 9x13 inch dish of it I figured it was a winner!  Surprisingly the chickpeas are delicious in this lasagna.  It is really creamy and oh so good!  It isn't the normal "American" lasagna that everyone loves, but it is much healthier and yes healthy (at least in this case) is a good thing!  You don't have to be vegan to enjoy this recipe, sometimes it is just nice to try something different and healthier.  I would love to put some chopped mushrooms in this recipe, but my kids hate mushrooms.  So for now I am going to enjoy my kids' delight when I make lasagna for them and leave out the mushrooms, but I highly suggest putting some in the sauce if you'd like.

If you are one of my many non-vegan friends, you can replace the Vegenaise with regular mayo since you probably don't have Vegenaise in your fridge.  Nutritional Yeast is a very good source of vitamin B12 and has a "cheesy" flavor - so I highly suggest you give it a try.

Chickpea Lasagna

Ingredients
9 whole wheat lasagna noodles
12 oz. can tomato paste
2 cans of water
1 pkg. spaghetti sauce mix
4 ½ cups chickpeas
3 Tbsp lemon juice
3 Tbsp nutritional yeast
4 ½ Tbsp Vegenaise
1 Tbsp Italian seasoning
1 Tbsp parsley
½ Tbsp minced garlic
18 oz. pkg. Daiya mozzarella (optional)

Directions

Cook noodles according to package directions. 

In a medium saucepan, stir together the tomato paste, water and spaghetti mix.  Let it simmer for 10 – 15 minutes, stirring occasionally.
Pulse the rest of the ingredients (except for the mozzarella) in a food processor until there are no more whole chickpeas and you have a somewhat chunky paste.  It is OK to have small chunks of chickpeas left.

Spoon just enough sauce to cover the bottom of a 9x13 inch pan; top with 3 of the cooked lasagna noodles.  Spread with 1/3 of the chickpea filling.  Sprinkle with a handful of cheese if you are using it.  Repeat layers twice more, except after the last chickpea layer spread the red sauce over it then sprinkle the cheese.  I usually have some leftover cheese when I am done, but feel free to use the whole package if desired.

Bake at 350 for 30 minutes.  Let stand for 5-10 minutes to set layers. 


Dilly Stew With Rosemary Dumplings


The wind is blowing and it is snowing.  On days like this I want something warm and comforting for dinner.  I have discovered a dumpling stew from one of my favorite blogs Post Punk Kitchen.  There are many yummy recipes to be discovered there!  Anyway, this is one of my favorite, newly discovered recipes and it provides a lot of comfort.  In fact my whole family enjoys the comfort from this stew - even the kids!  You don't have to be vegan to fall in love with this.  I encourage you to check out the other recipes from Post Punk Kitchen too! http://www.theppk.com/recipes/  I did make a couple changes, only because I didn't have fresh herbs on hand, but I had dried.  For the fresh thyme I used 1 tsp. dried and for the fresh dill I used 2 tsp. dried.  I didn't have sweet paprika so I just used plain old paprika.

Dilly Stew With Rosemary Dumplings
by Isa Chandra
serves:  6-8
time:  1 hour

For the stew:
3 tablespoons olive oil
1/4 cup all purpose flour
1 medium sized sweet onion (like Vidalia or Walla Walla), quartered and thinly sliced
1 teaspoon salt
3 cloves garlic, minced
6 cups vegetable broth, at room temperature
2 stalks celery, tops removed, sliced 1/4 inch thick
1 1/2 pounds potato, in 3/4 inch chunks (peel if they’re russets)
1 cup baby carrots (see note)
1 tablespoon fresh thyme
2 tablespoons chopped fresh dill
1/2 teaspoon sweet paprika
Fresh black pepper
1 15 oz can navy beans, rinsed and drained (about 1 1/2 cups)


For the dumplings:
1 1/2 cups all purpose flour
2 teaspoons baking powder
1 tablespoons dried rosemary, finely chopped
1/2 teaspoon salt
3/4 cup unsweetened almond milk (or soy)
2 tablespoons olive oil


First we’re going to make a roux, but it has a little less fat than a traditional roux, which means it doesn’t get as goopy. If you’d like a more traditional roux, just add extra oil.

Preheat a large, heavy bottom pot over medium-low heat.
Add the oil and sprinkle in the flour. Use a wooden spatula to toss the flour in the oil, and stir pretty consistently for 3 to 4 minutes, until the flour is clumpy and toasty.

Add the onion and salt, and toss to coat the onions completely in the flour mixture. As the onions release moisture, they will coat more and more. Cook this way for 5 minutes, stirring often. Add garlic and stir for 30 more seconds or so.

Stream in the vegetable broth, whisking constantly to prevent clumping. Add the celery, potatoes, carrot, dill, thyme, paprika and black pepper, then turn the heat up and cover to bring to a boil. Keep a close eye and stir often, so that it doesn’t clump or boil over.

Once boiling, reduce the heat to a simmer and let cook uncovered for 20 to 25 minutes, stirring occasionally, until the stew is nicely thickened and the potatoes and carrots are tender.

In the meantime, prepare the dumplings.

Sift the flour, baking powder and salt together in a large mixing bowl. Mix in the rosemary. Make a well in the center and add the milk and olive oil. Use a wooden spoon to mix together until a wet dough forms.

When the stew is ready, mix in the beans and plop dough right on top of the stew in spoonfuls. You should get about 14 dumplings. Cover the pot tightly and cook for about 14 more minutes. The dumplings should be nice and firm. Use your ladle to dunk them into the stew to coat.

Ladle stew into bowls, topped with dumplings. And serve!


Recipe Notes:
~If your baby carrots are the plump kind, then slice them in half on a diagonal. If they’re thin, don’t bother. And if you’d like to use adult-sized carrots, peel and slice them in 1/4 inch diagonal pieces.

~I use a Le Creuset Dutch oven for this. You don’t need to use cast iron, but the wider the pot the better, because you need lots of surface area to make the roux and cook the biscuits later. If you don’t have a wide pot, then using a large, deep pan will work, too.

Cranberry Orange Cookies


I love cranberry orange everything (especially cranberry orange oatmeal for breakfast, yum!).  So, today I had to try out cranberry orange cookies.  I was going to do something chocolaty for Valentine's Day, but thought having red cranberries in the cookies sort of counts as part of a Valentine's theme.  These cookies are so delicious!  My daughter, Kait, was eating them like the world was coming to an end.  Something about the orange sugar on these cookies makes them extra special.  They are a new favorite here - I highly recommend these every day - and especially for your sweethearts this Valentine's Day.

Cranberry Orange Cookies
Cookies:

1 Tbsp. ground flax seeds
3 Tbsp. water
1 cup sugar
3/4 cup vegan butter, softened
2 cups all-purpose flour
1 1/2 teaspoons baking powder
1/4 teaspoon baking soda
1/2 cup sweetened dried cranberries, chopped
1 tablespoon freshly grated orange zest

Orange Sugar:
1/3 cup sugar

1 teaspoon freshly grated orange zest

Heat oven to 350°F.

Combine flax with water and mix well.  Set aside and let it sit for at least a few minutes.

Combine all orange sugar ingredients in small bowl; stir until well mixed. Set aside.

Combine 1 cup sugar, butter and and the flax/water mixture in large bowl; beat at medium speed until creamy. In a separate bowl combine the flour, baking powder and baking soda. Add slowly to the other ingredients and beat until well mixed. Add all remaining ingredients. Continue beating just until mixed.

Shape dough into 1-inch balls; roll balls in orange sugar. Place 2 inches apart onto ungreased cookie sheets. Flatten with bottom of glass to 1 1/2-inch circles.

Bake for 8-10 minutes or until edges are lightly browned. (DO NOT OVER BAKE.) Cool 1 minute; remove from cookie sheets.

Pumpkin Ravioli

My kids love ravioli.  It is one of their favorite things to eat.  It is not easy to find something they both love, or at least it sure seems that way sometimes.  So I like to make it for them now and then for dinner.  The only problem is ravioli tends to be filled with meat or cheese or even both.  So I decided to give pumpkin a try.  It turned out to be a very good decision!  As I have said before in an earlier blog, I am not exactly crazy about pumpkin, but I loved these raviolis.  They tasted so much better than I thought they would be and I can't wait to have them again!  Even my husband was surprised, and he likes pumpkin far less than I.  So here is another great fall recipe for you to try.  They are really not that hard to make especially not having to make your own dough.  Just make sure there are no eggs in the dough, if you are going a vegan route - most seem to have eggs.  I used gyoza wrappers, but you could also try wonton if you prefer. If you can't find vegan Parmesan in the store, you can use the easy recipe at the end of this post.  Also, you can use fresh sage (about 16 leaves) instead of the dried stuff. 


Pumpkin Ravioli
Makes 4 servings

1 15 oz. can of pumpkin puree or 1 1/2 cups

1/2 Tbsp balsamic vinegar

pinch of ground nutmeg

2 Tbsp vegan Parmesan, plus more for garnish

salt and black pepper to taste

24 gyoza wrappers

4 Tbsp Earth Balance vegan buttery sticks

1/2 tsp. rubbed sage


Mix the pumpkin, vinegar, nutmeg, and Parmesan; season with salt and pepper.

Working on a clean surface, lay down a single gyoza wrapper and place a small spoonful of the pumpkin mixture in the center, being careful not to overstuff (I used about 1 1/2 - 2 tsp).  Rub the edges of the wrapper with water, then fold in half.  Press firmly around the edges with your fingers to secure the filling inside the ravioli.  Repeat with the remaining wrappers to create 24 ravioli.

Bring a large pot of water to a boil over high heat.  Salt the water and turn down the heat to medium so that it's gently boiling.  Carefully drop in the ravioli and cook for 3 minutes, then drain.

In the meantime, heat a large skillet over medium heat and add the butter and sage.  Cook until butter is lightly brown and begins to give off a nutty aroma.  (Do this carefully so you don't burn the butter.)  Add the cooked ravioli to the pan and toss gently to make sure they don't break.  Sprinkle with Parmesan if desired.


Homemade Vegan Parmesan

1/2 cup blanched almonds or white sesame seeds
2 Tbsp nutritional yeast flakes
1 - 2 tsp light miso
heaping 1/4 tsp salt

Grind almonds or sesame seeds to a fine powder in a food processor fitted with a metal blade.  Add remaining ingredients and pulse or process until well mixed.  Store in an airtight container in the refrigerator.  Shake container before using to break up any lumps.  Will keep for a month or longer.  May be frozen.

Fluffy Vegan Pumpkin Biscuits

I am not a huge pumpkin fan, but for some reason it has been sounding kind of good lately.  Maybe I am just really into the season this year.  Anyway I thought I would try some pumpkin flavored biscuits to have with our soup this week and they actually tasted really good.  I found the recipe from An Opera Singer in the Kitchen http://www.singerskitchen.com/.  I didn't have the whole wheat white flour she called for, so I went with whole wheat pastry flour and it turned out well. I am sure all purpose white flour would work as well. So if you are having a hankoring for something with pumpkin or just want to try something new, this recipe is simple and delicious!

Fluffy Vegan Pumpkin Biscuits
makes a dozen 

2 cups whole wheat pastry flour
1 Tsp. baking powder3/4 tsp. salt
2 Tsp. brown sugar
1/2 tsp. cinnamon
1/4 tsp. nutmeg
3 Tsp. Earth Balance margarine
3/4 cup pumpkin puree
1/2 cup So Delicious coconut milk
2 Tsp. agave nectar

Preheat the oven to 450 degrees and line a baking sheet with parchment paper or lightly spray with oil.

In a large bowl, whisk together the flour, baking powder, salt, brown sugar, and spices. Blend in the margarine using a pastry blender.

In a medium bowl, combine the pumpkin, coconut milk, and agave nectar.
Pour the wet ingredients into the dry ingredients and stir until the mixture holds together. Knead lightly on a floured surface and roll out to 1″ thickness. Using a 2″ biscuit butter, cut the dough into circles.
 
Re-roll the scraps and cut out biscuits until you have used all of the dough. Place on the prepared baking sheet.
 
Bake 12-14 minutes or until golden brown. Serve warm.


Apple Nachos

It is apple season time and my family loves apples.  This year I spotted a recipe for some apple nachos and just had to try them!  My family kept having me repeat that I was going to make them "apple" nachos.  They thought they must be hearing me wrong.  Anyway it was a big hit!  You really can't go wrong making these - and the fun thing is you can really get creative with what you put on these.  You definitely want crispy apples and the slightly tart goes really well with all the sweet things you put on them - so keep that in mind.  This is what I did with my nachos - but feel free to be creative and put your favorite things on it.


Apple Nachos

3 crispy and slightly tart apples
3 tbsp creamy natural peanut butter
1/4 cup sliced almonds
1/4 chopped pecans
1/4 cup coconut flakes
1/4 cup vegan chocolate chips

Slice the apples thin enough so it would be easy to eat the slice in one or two bites.
Then melt the peanut butter, until it is runny, and drizzle it all over the apples. Next, top the apples and peanut butter with sliced almonds, chopped pecans, coconut flakes and chocolate chips. Then go nuts!

Lentil Sloppy Joes

This recipe in yet another that proves that being vegan doesn't limit you.  These sloppy joes are so hearty and delicious you almost forget that it is vegan.  It is so much healthier than eating a traditional sloppy joe, but doesn't make you feel like you are eating "health food".  It is a must try for everyone, even those who love their meat.  I originally found this recipe in Veganomicon, but I have tweaked it to my own tastes.  By the way, Veganomicon is an awesome cookbook for those of you needing vegan recipes.


Lentil Sloppy Joes
serves 4 - 6

1 cup uncooked lentils
4 cups water
1 Tbsp. olive oil
1/2 cup onion, diced small
1/2 cup bell pepper, diced small
2 cloves garlic, minced
1 Tbsp. chili powder
2 tsp. oregano
1 tsp. salt
1 (8 oz.) can tomato sauce
1/4 cup tomato paste (or half of 6 oz. can)
3 Tbsp. pure maple syrup
1 Tbsp. yellow mustard (or your favorite)
whole wheat hamburger buns (or buns of your choice)

Rinse lentils and put them in a small saucepan along with the water.  Bring to a boil.  Once boiling, lower heat to a simmer and let it cook for another 15 minutes.  (My lentils seem to cook really fast, so at this point check to see if yours are tender or need a little more time.  Most cookbooks say about 20 - 30 minutes.  Mine takes about half that time.  You don't want them to be mushy - you want them to still hold their shape.)  Once lentils are soft, drain and sit aside.

As the lentils are cooking, preheat a large skillet over medium heat.  Saute the onion and pepper in the oil for about 5 minutes or until softened.  Add the garlic and saute for about a minute more. 

Stir in the cooked lentils, chili powder, oregano, and salt.  Add the tomato sauce and tomato paste.  Cook for about 10 minutes.  Add the maple syrup and mustard, and heat through.

Serve on hamburger buns either open faced, or as a sandwich.


Teriyaki Bean Wraps

This is one of my family's favorite dinners.  My youngest daughter often requests this for dinner. You know it is good, if my youngest daughter will eat it!  It is really simple and quick to make too!  You can have fun with this recipe by substituting the red beans for any bean you like and also the quinoa for your favorite grain. I cook my beans myself, but you can use canned beans if it is easier.  Just make sure you drain and rinse them first.  You will need 2 cans for this recipe. This is such a great recipe for the summer.   I hope you enjoy it as much as my family does!


Teriyaki Bean Wraps

1/8 tsp. pepper
2 cloves garlic, minced
1/3 cup brown sugar
2 Tbsp. soy sauce
1 cup vegetable broth
1 Tbsp. lemon juice
1/8 tsp. cayenne pepper
2 Tbsp. cornstarch
1/4 cup water
2 1/2 - 3 cups red beans, cooked
1/2 cup quinoa
4 mission style tortillas (large)
2 carrots shredded
romaine lettuce, torn or shredded

Cook quinoa according to package's directions.

Combine first 7 ingredients in a medium saucepan.  Heat on medium-high heat stirring occasionally until it comes to a boil.  Combine cornstarch and water in a separate bowl.  Stir into the heated ingredients until it thickens.  Add the beans, turn to low and let simmer for about 10 minutes. 

Heat tortillas in a warm skillet.  Add beans down the center of the tortilla.  Top with quinoa, carrots and lettuce.  Wrap like a burrito and it is ready to eat!  You may want to wrap it in foil and tear the foil off as you eat to keep burrito from falling apart (also keeps it warm).

Classic Macaroni Salad

My oldest daughter and I love, love, love the macaroni salad you can buy at the local grocery store deli.  Unfortunately now that I am vegan we haven't been able to buy it.  (I can't buy it for my family and watch them eat it - that would be torture!)  So, I have found a way to make it vegan at home!  I have to  admit, however, it is not very good for you, but sometimes you have to treat yourself! 


Classic Macaroni Salad
makes about 5 servings

2 cups uncooked ditalini pasta
1/2 cup vegenaise
2 Tbsp. white wine vinegar
1/3 cup cane sugar
1 Tbsp yellow mustard
3/4 tsp. salt
1/4 tsp. ground black pepper
1/2 cup chopped onion
1 stalk celery, chopped
1/2 bell pepper, seeded and chopped (color of your choosing)
1 Tbsp. chopped pimento peppers

Cook pasta according to package directions.  (I don't salt my water to cut down on sodium.)  Cook until it's al dente.  Drain and rinse under cold water.  In a large bowl, mix together the vegenaise, vinegar, sugar, mustard, salt, and pepper.  Stir in the onion, celery, bell pepper, pimentos and macaroni.  Refrigerate for at least 4 hours before serving, or preferable overnight.

Breakfast Tatortot Stir-fry

I love to eat oatmeal with fruit and nuts for breakfast, but my favorite is eating breakfast stir-fry.  My hubby, Greg, started making it for us several years ago and at first I thought he was crazy (probably what you are thinking also).  It isn't the typical breakfast food, but it is such a great way to start your day.  You are giving your body lots of protein, nutrients and vitamins to start your day.  We also like to cook it in our cast iron skillet so we get some extra iron.  I always feel best if I have stir-fry for breakfast.  Greg and I take turns making our own version of it.  Mine actually started as more of a hash brown dish back when we were eating eggs and ham, but now I have cut out the eggs and ham and put in yummy veggies along with a grain and beans.  So delicious and satisfying!  The fun thing about this breakfast is you can mix it up each time you make it.  I try different beans, grains and vegetables each time.  I love to put barley and frozen peas in it though!  So feel free to put the things you love in it and play around and have fun.  Also, play around with your own favorite seasoning and such.  Greg and I like to sprinkle ground flax seed before we eat it and I love to put hot sauce on mine! Be brave and give this a try.  Your body will thank you!  One more note, I don't use salt and pepper in this recipe, but feel free to add it if you want it.


Breakfast Tater tot Stir-fry
makes 2 large servings

20 tater tots
3 cloves garlic, minced
1/2 cup diced onion
1/2 cup diced red pepper
3/4 cup green beans
3/4 cup barley
3/4 cup navy beans
handful of spinach, chopped
1 tsp chili powder
1 tsp curry powder
1 tbsp black bean garlic sauce
1 tbsp hoisin sauce
handful of spinach, chopped

Put tater tots in skillet and cover.  Cook on medium-high heat until soft enough to mash with the back of a spoon, stirring or shaking skillet occasionally.  When tater tots are soft, mash them up and add garlic, onion, pepper, green beans and barley and navy beans.  Stir it for about a minute. Add chili powder, curry powder, black bean paste and hoisin and stir it all into the vegetable well.  Stir-fry for a couple minutes until everything is heated through.  Turn off the heat and stir in spinach.  Let it sit for a minute to heat the spinach and then it is ready to serve. 

Peanut Butter Crisscrosses

While my girls and I were away visiting my parent's buffalo ranch in northern Idaho, my husband was very sweet and bought me a new cookbook I had been wanting - Vegan Cookies Invade Your Cookie Jar.  I have been home for a week now and was very excited to try a recipe this morning.  I have tried various recipes out of the book already after checking the book out of the public library and the cookies have been delicious.  So far our family favorite is Peanut Butter Chocolate Pillows which I will post in the near future.  Today I was on a peanut butter kick so I went for the classic peanut butter cookie.  These cookies are so delicate they almost just melt in your mouth.  If you like peanut butter cookies - here is an easy vegan one to try.
 

Peanut Butter Crisscrosses

1/2 cup nonhyrdogenated vegetable shortening
1/2 cup natural smooth peanut butter (try to get the no-stir kind if you can find it.  If you can't then stir like crazy so that the PB isn't clumpy).
3/4 cup sugar
1 teaspoon pure vanilla extract
2 tablespoons light molasses (not blackstrap)
1 1/4 cups flour
2 tablespoons cornstarch
1/2 teaspoon baking powder
1/2 teaspoon salt
1 to 2 tablespoons nondairy milk (optional)

Preheat oven to 350 F degrees.  Lightly grease two cookies sheets.  We prefer dark cookie sheets to get the cookies browned and crispy.

In a  large mixing bowl, beat together the shortening, peanut butter, and sugar until light and fluffy.  This can take up to 2 minutes with an electric mixer at medium speed or 4 minutes just using a fork.  Mix in the vanilla and molasses.

Add half the flour along with the cornstarch, baking powder, and salt and mix well.  Add the remaining flour and mix.  Use your hands at this point to really work the ingredients together.  The dough should hold together when squeezed; if it does not, then add a tablespoon or two of nondairy milk until it does.

Roll the dough into walnut-size balls, flattening them a bit with the palms of your hand.  The dough may crack on the edges and that is fine.  Place the dough balls on the cookie sheets.  Flatten them further with the bottom of a coffee mug.  Use the underside of fork tines to press cross hatches into the cookies, one horizontal and one vertical. 

Bake the cookies for 10 to 12 minutes, until the edges are very lightly browned.  Remove the cookies from the oven and let them cool on the sheets for 10 minutes - any less and they might crumble.  Use a thin, flexible spatula to transfer the cookies to wire racks to cool completely.

Bean Salad Sandwich

Ok, I've been seeing ads everywhere for chicken salad sandwiches lately.  The apples and grapes on the sandwiches look so good!!  But no chicken for me!  So... I have decided to create my own sandwich.  It actually turned out very well, at least in my opinion.  I am usually the only one around for lunch, but my husband took a bite the other day and thought it was good!  So here is an adventurous sandwich for all of you to try if you are brave enough.  I have made it a few times and can't wait to have it again soon!  A little note:  I have found this can be messy if you put too much on your sandwich -  pitas would work really well for this sandwich.

Bean Salad Sandwich
Makes 2 sandwiches (or 1 large sandwich)

1/4 cup chopped apple
12 grapes cut in 1/2
1 1/2 Tbsp. chopped walnuts
1/3 cup navy beans
1 1/2 Tbsp. chopped celery
1 tsp chopped parsley
1 Tbsp. finely chopped onion
1 Tbsp. veganaise (more if you like)
salt and pepper to taste
handful of spinach

Mix all the ingredients together except for spinach.  Spread it on your favorite bread (pita would work really well with this because it can be a bit messy).  Top with spinach and enjoy!